Step 1
1. Open e-maersk.eu and click "Create new user account".

Step 2
2. Fill in registration form.
a) Fill in details:
User name (your login) should be equal to your Email address,
Password should contain 6 characters, at least one lowercase letter (a-z), at least one uppercase letter (A-Z),
Name,
Last name,
Email address.
b) Choose relevant role: CUSTOMER.
c) Fill in full company name.
d) Choose relevant country: Czech Republic or Slovakia.
e) Fill in company address: city, street, company phone number, zip code.
f) Accept terms and conditions.
g) Click "Activation PIN".
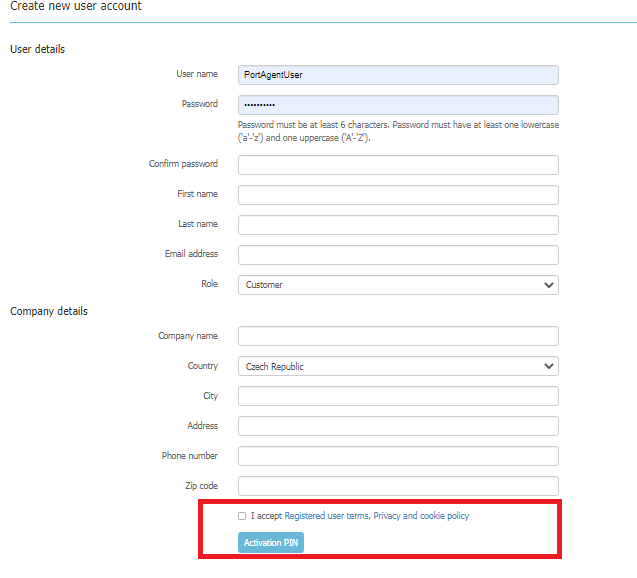
User will receive Activation PIN through mail.
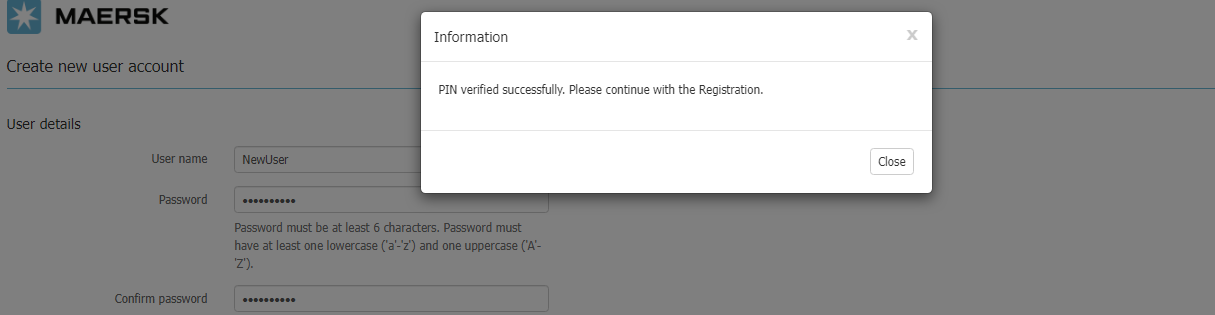
After entering the activation PIN, click "Verify PIN"

PIN verification success popup will display and click "Close", User will able to "Register" button
After clickin "I'm not a robot", click "Register"

Step 3
When you receive email from EMAERSKCZ@maersk.com, please follow the link in this email and confirm your email address.

Step 4
System administrator confirms your registration request and you will receive final email that your account is activated.

Now you can login e-maersk.eu.

There are 3 MAIN VIEWS in e-maersk.eu:
IMPORT shows all your import containers arriving to ports Koper, Bremerhaven or Hamburg (CY or SD).
For SD shipments Place of delivery is in Czech Republic or Slovakia.
Shipments appear in Import view 3 weeks prior ETA to final discharge port and later for shorter transit time.
You can see the shipment list if you are stated as consignee in bill of lading or if you have provided Power of Attorney from consignee to handle import arrivals.

EXPORT shows all your SD export bookings with place of receipt in Czech Republic or Slovakia and where first leg is TRUCK.
Shipments appear in Export view after you receive Booking confirmation.

TRUCKS shows truck capacity situation for Czech Republic and Slovakia.
You can see all your export and import containers planned for loading or delivery by truck for selected day.
When export SD shipment appears in EXPORT view and import container is planned for truck delivery in IMPORT view, you can also see these containers in TRUCKS view.

Note: in case you miss any of your shipments, do not hesitate to contact your customer service contact person.
There are several filters in all IMPORT TABS, which will help you to find needed information easily.
Search You can search as per shipment, bill of lading or container numbers. As per single number or multiple numbers via semicolon (;) or colon (,) or blank ( ).

ETA You can filter as per Estimated time of arrival(ETA) of your shipments to final discharge port. Default values are FROM: TODAY -10 days TO: TODAY +20 days to show you current arrivals.

Vessel You can filter as per final vessel name
From or as per first port of loading
Port or as per final discharge port.

Service mode You can filter as per your SD or CY shipments
Place of delivery or as per Place of delivery from your B/L. Sometimes truck delivery can be to different city which will appear only in TRUCKS, in IMPORT remains what was on B/L.
Delivery date or as per date of truck delivery.

ALL
Capture your core import arrivals information in tab ALL.
Here you can find the list of all your import containers in all statuses.

NEW
Work with your release and inland delivery requests in tab NEW.
All arriving containers without import instructions are listed in tab NEW. You can place import instructions: release in port requests or inland delivery requests for single container or for multiple containers using
templates.

PENDING TASKS
Work with your incomplete requests in tab PENDING TASKS.
All incomplete shipments needed additional information from your side are shown in this tab. E.g.: Delivery date/time missing, Missing customs documents, Missing empty return depot, etc.

AWAITING MAERSK
Trace the status of your requests in tab AWAITING MAERSK.
When you submit your import instructions, your requests go directly to customer service department and dispatchers for action. All shipments pending for ML confirmation are shown in this tab with status: Delivery/Release
request awaiting confirmation from ML.

FINALIZE
See your processed release and inland delivery requests in tab FINALIZE.
When your requests are completed by customer service, their status changed to Processed and transferred from Awaiting Maersk Line to Finalized tab.

TEMPLATES
Create templates for your frequent import requests in tab TEMPLATES.
If your import requests always contain the same information (For example: Delivery request: delivery address, contact person, payers, etc), you can fill in template and apply it for multiple containers with the same
details.

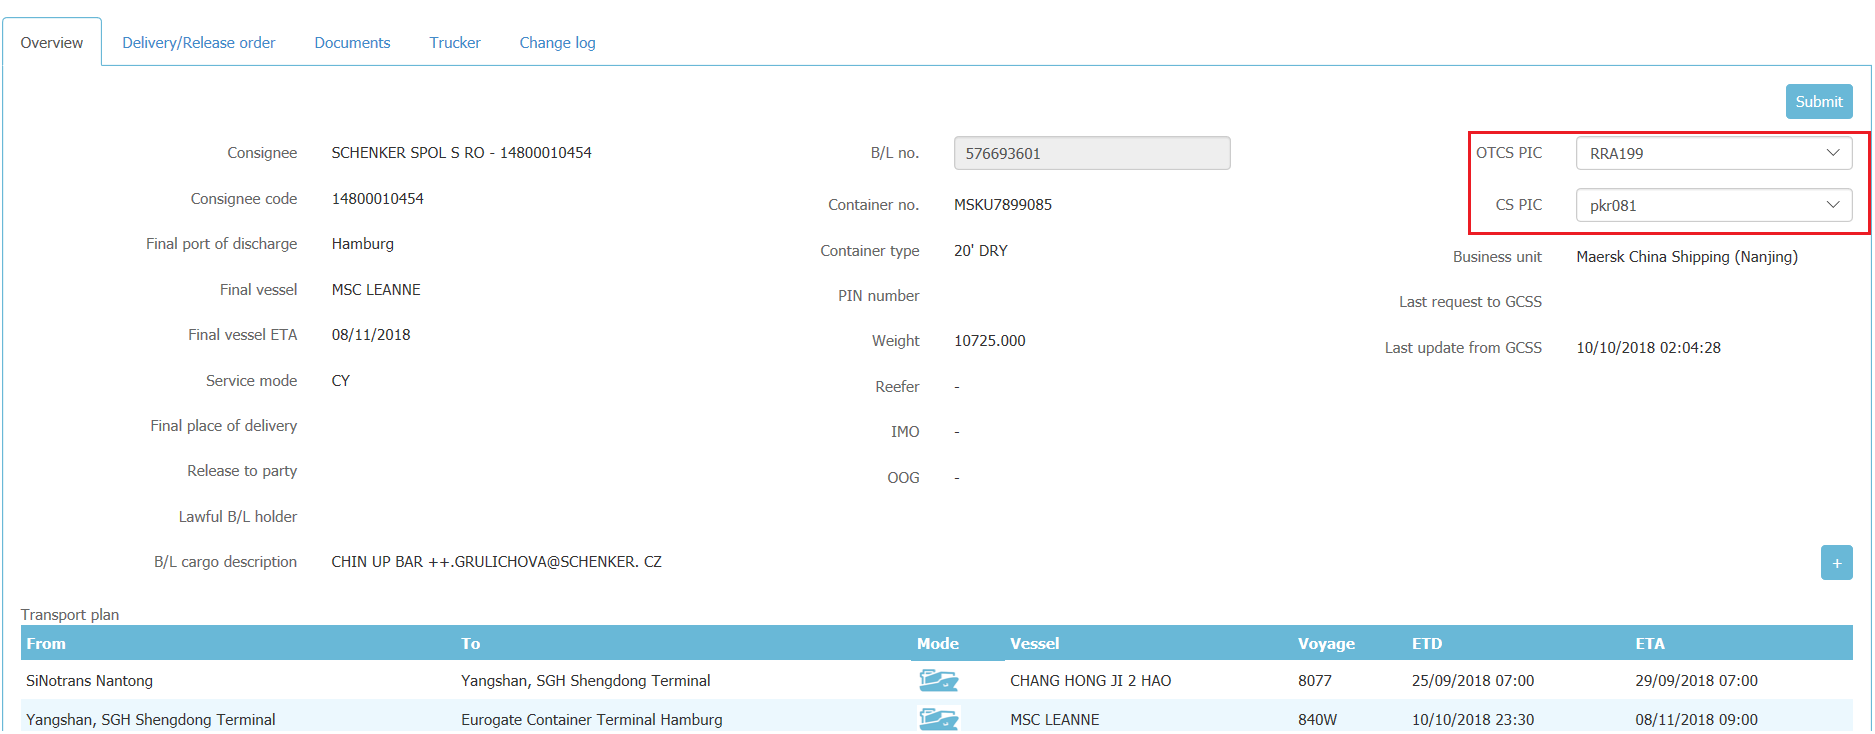
Click on the Shipment number and drop to the Shipment, where you can find:
OVERVIEW here there is all information about the shipment and transport plan.
CS should nominate PIC (CS/OTCS) it can be done by two options:
a.Tick several shipments from the list, clicks button "Functions" above the table and select "Nominate CS PIC" or "Nominate OTCS PIC", a window appears with a list of employees (name and id) in which select an employee and
clicks on "Nominate".
b.Drop to the shipment. In the Overview tab select fields "CS PIC" or "OTCS PIC", choose responsible employee from the list and click "Submit".
DELIVERY/ RELEASE ORDER CS should nominate Inland Forwarder it can be done by two options:
a. If it is needed to nominate Inward Forwarder for multiple shipments, select relevant shipments from the list, choose Forwarder from the drop-down list of companies and press button "Nominate"
b. If it is needed to nominate Forwarder for a single shipment, drop to the shipment go to Delivery/Release order choose Forwarder and update the relevant company from the drop-down list.
Or put Delivery date and address by two options:
a. Tick several shipments from the list, click button "Functions" above the table and select "Changes delivery dates and time", in a window appears set new delivery date and time and click on "Submit".
b. Drop to the single shipment and change delivery date and place in Delivery/Release order window.

c. Company Name in Delivery address section is mandatory for all countries.

d. Custom Clearance section is mandatory for all countries.
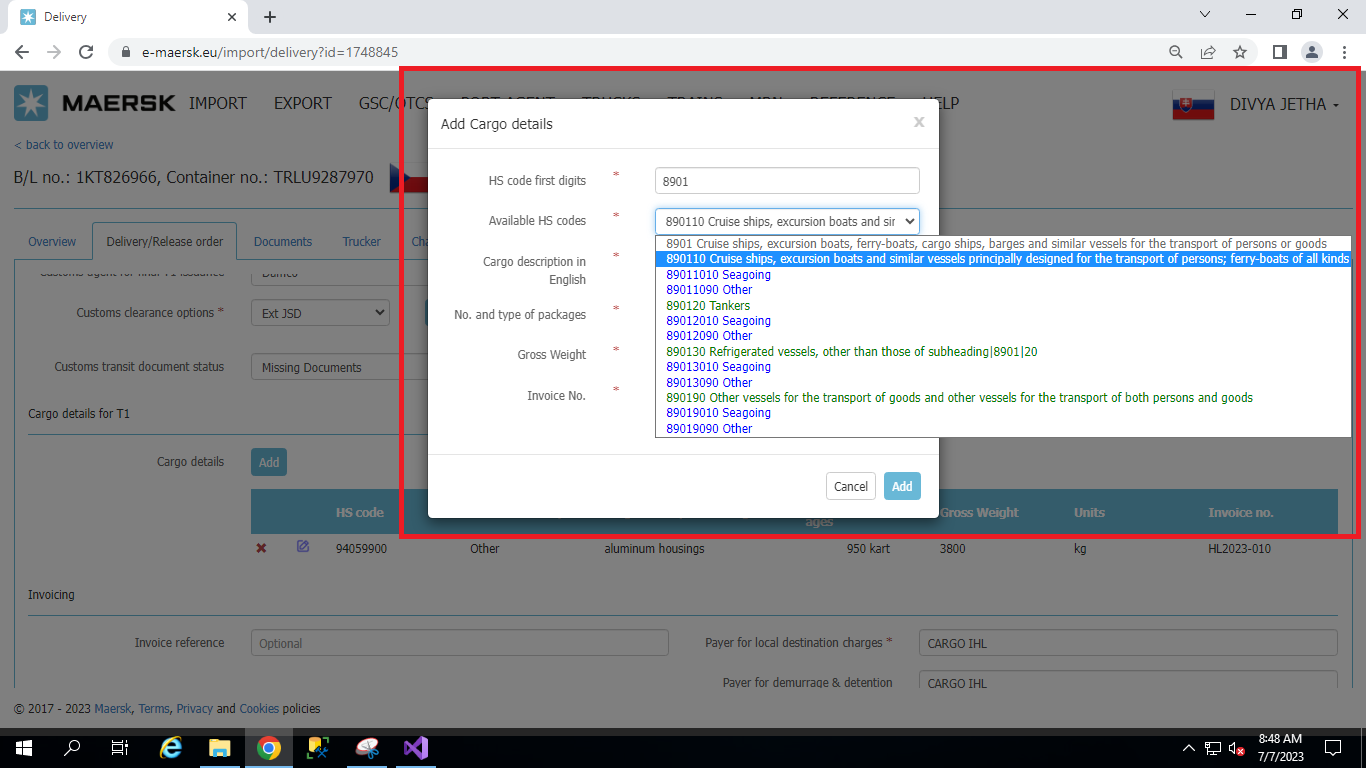
Hs code changed to Cargo details with Additional information in grid like : Cargo description in English, No. And type of packages, Gross weight , Units and Invoice no.

Click on "Add" above the grid. The HS Code popup will display.

HS CODE length changed from 6 digit to 8 digit and also only 8-digit code length is made selectable. The list of available HSCODE is in Tree structure
(DOCUMENTS) - CS can add/remove documents of shipment or send notification to a Customer
a.Tick the shipment from the list, click the FUNCTION button on the right and choose the action needed. In pop up window find the automatically generated by the GCSS text of the letter and addresses above (which may be
edited)
b.Drop to the shipment and go to the Documents. See, add, remove or send notification to Customer about missing documents.

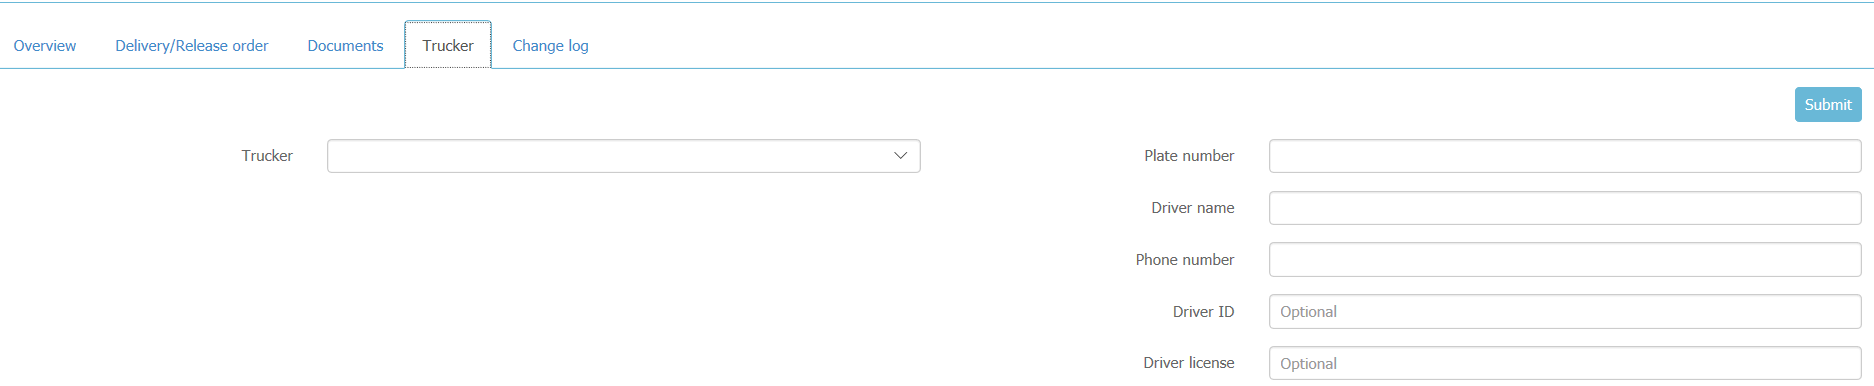
(TRUCKER) CS has the option to see all trucker data (name, license, driver ID, phone etc.)
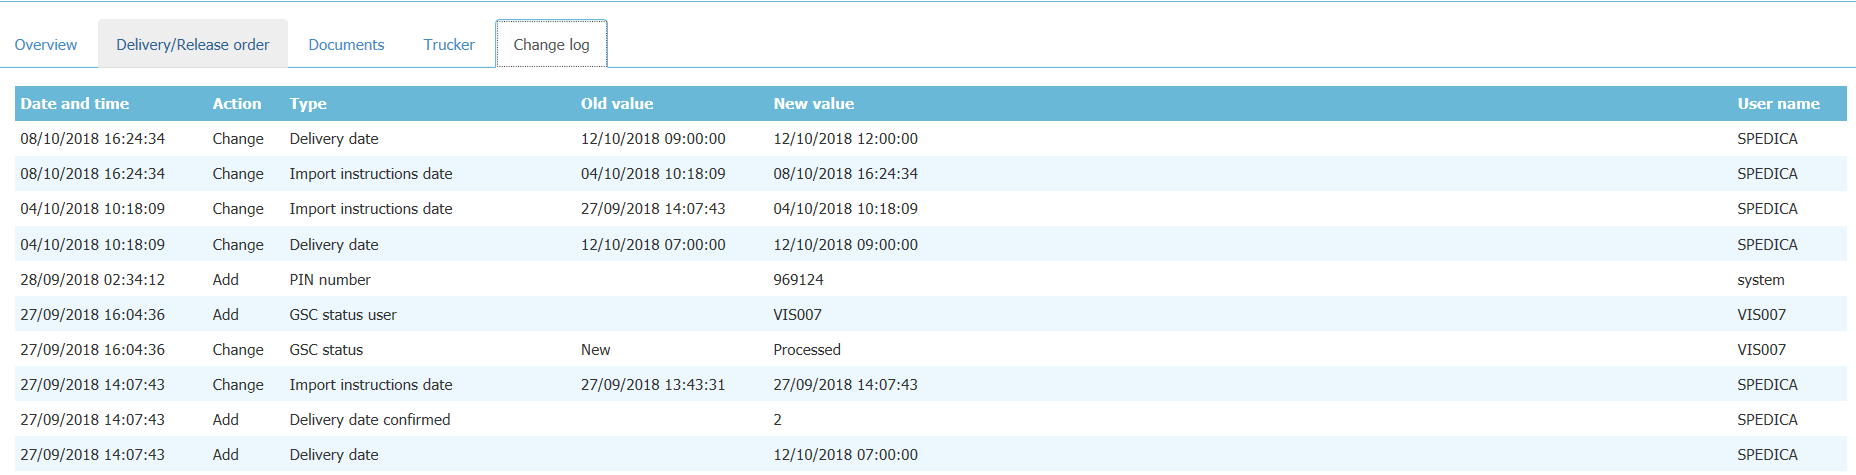
(CHANGE LOG) CS can find the chronology of all changings and persons who made them. The TAB “Change log” is not displayed for Customer and it is visible only for inner users.
- The list of all your arriving shipments (bill of lading, container numbers, type and size)
- Vessel name
- First load port and Final discharge port
- Estimated time of arrival (ETA)
- Service mode (CY – container yard or SD – store door)
- City and date of delivery for scheduled inland delivery requests
- Status of your delivery or release requests
- Train status updates

Click on the bill of lading number and go to Shipment overview screen, where you can find additional information:
1. Transport Plan.
2. Bill of lading cargo description.
3. PIN number (if container already released).
4. Weight.
5. Cargo type.

Create templates for your frequently used import instructions and apply templates for multiple containers requests.
Add a new template
1. Go to the tab Templates, press FUNCTION>Add new template.

2. Choose type of import instructions for template: Release in port or Inland delivery.

3. Fill in relevant instructions and press Save.
Note: add to the end of template name: Release in port or Inland delivery, so you can differentiate easily templates Inland delivery templates should be applied to SD bookings and CY bookings (in case import shipment is
needed).
Release in port template form:
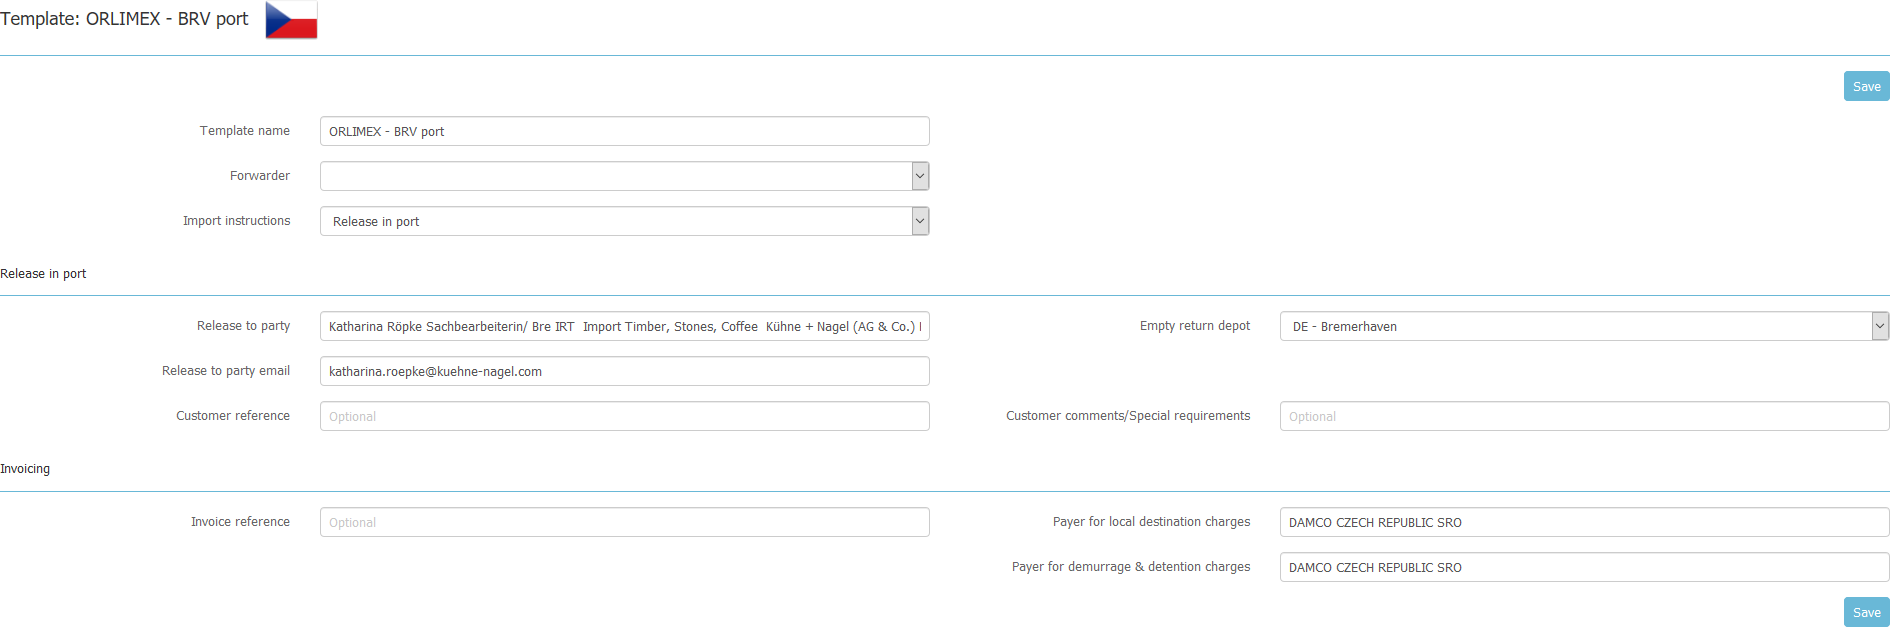
Inland delivery template form:

Change template
Press needed template line, enter template from, change details and click Save.
Delete template
Tick needed template and press FUNCTIONS>Delete template. In pop up window, click Remove.

Go to the tab New or All and find needed tpdoc or container number as per SEARCH option.
Click needed tpdoc and go to Delivery/Release order tab.

In Delivery/Release order tab choose Import instruction: Release in port.
Fill in mandatory details and click Submit.
Note: release to party email should be requestor’s email, person who will get PIN.

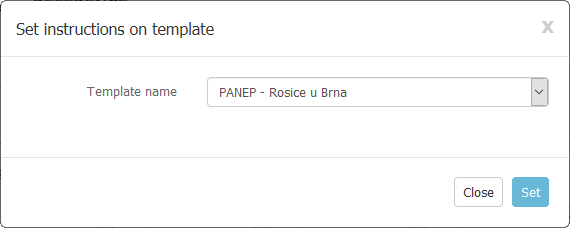
If you use "Set instructions on template" the order status automatically becomes "New".
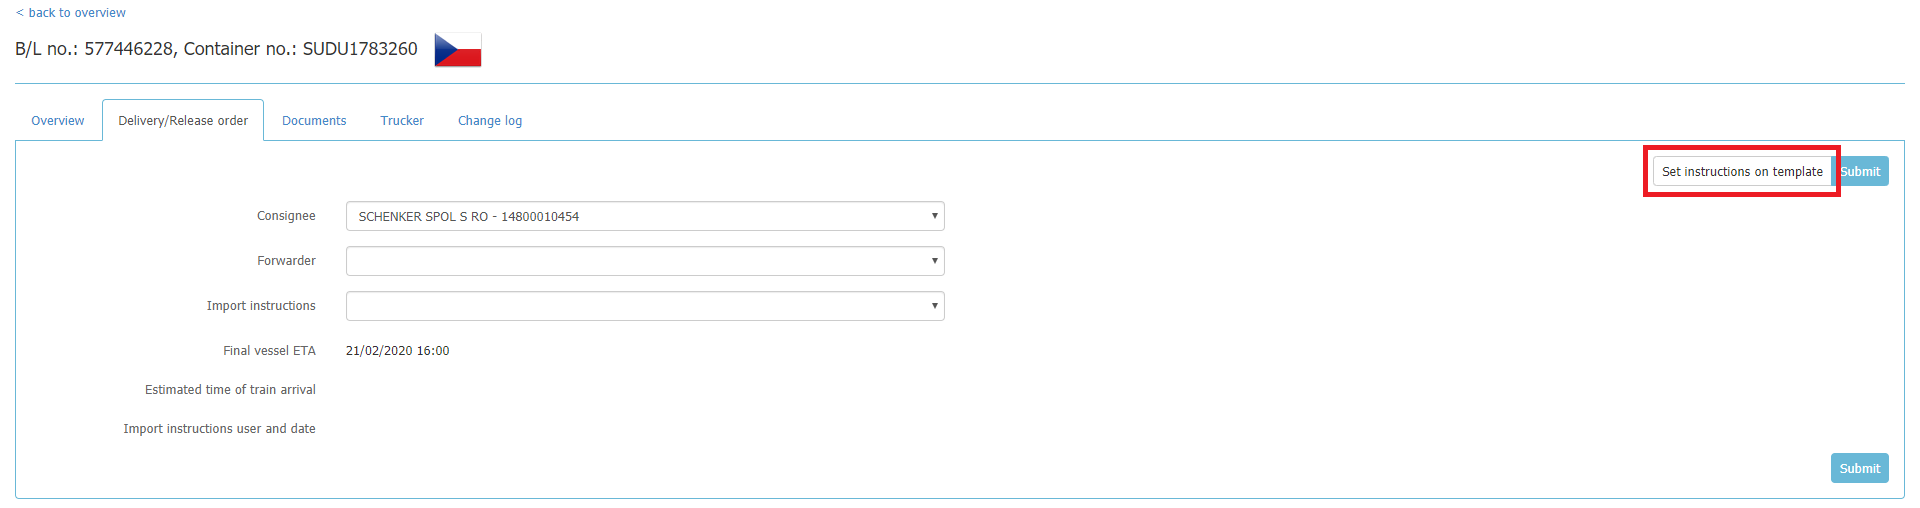
Go to the tab New or All and find needed bills of lading or container numbers as per SEARCH option.
Tick needed bills of lading and press FUNCTION>Set instruction on template.

Choose needed Template from the dropdown list and press Set.

Go to the tab New or All and find needed bill of lading or container number as per SEARCH option. Click needed bill of lading and go to Delivery/Release order tab.
Fill in details in the form and press Submit.
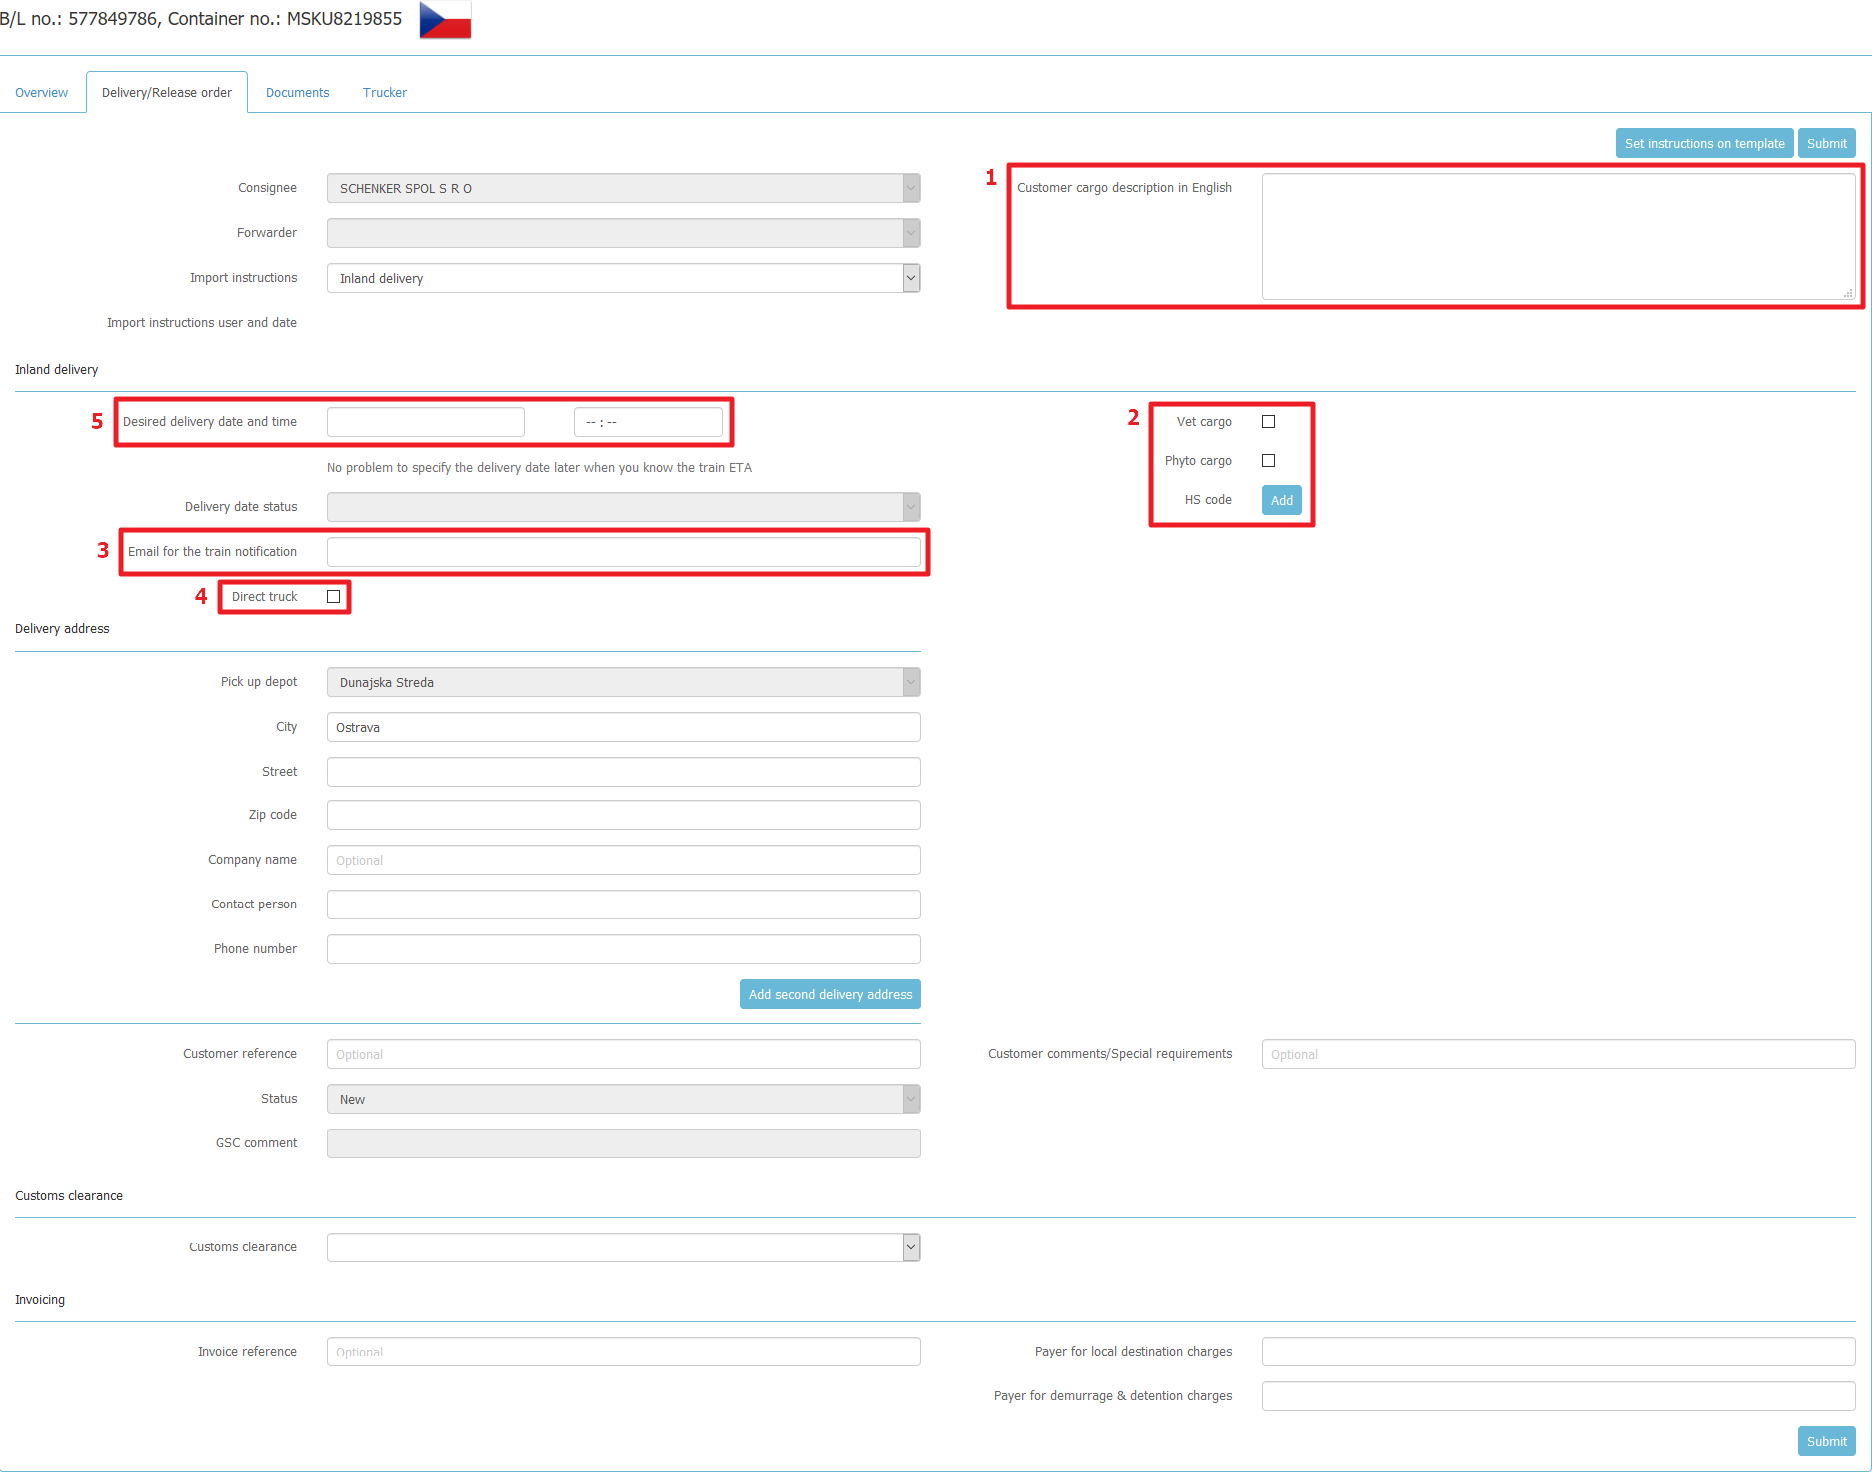
Fields:
1. Customer cargo description in English - specify detailed cargo description inside the container, information is used for customs transit document and needs to match the HS codes.
2. HS code and cargo type - specify all HS codes of cargo inside the container, as information used for customs transit document. In case your cargo requires Veterinary or Phyto check in the port, do not forget to
tick accordingly, as train needs to be planned after checks are completed.
3. Email for the train notifications - to this email train status notification will be sent when containers planned for loading.
4. Direct truck - if you want your container to be delivered on direct truck from the port, please tick the box and await written information on availability, rate and delivery date/time possibilities from our
customer service department.
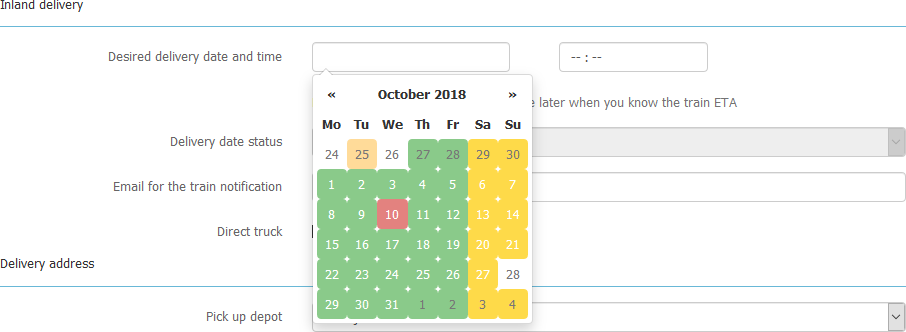
5. Desired delivery date and time - this field can be updated later, based on train arrival date.
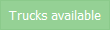
In calendar you can see when trucks are available and plan your delivery requests accordingly.

GREEN - Trucks are available. You can choose green dates for deliveries.

YELLOW - Trucks are available only as per intermodal department confirmation. Afternoon deliveries have higher probability to be approved.

RED - Trucks are not available. You can choose the other dates for deliveries.

WHITE – Dates are not available for delivery (e.g. National holidays, past dates, current date).
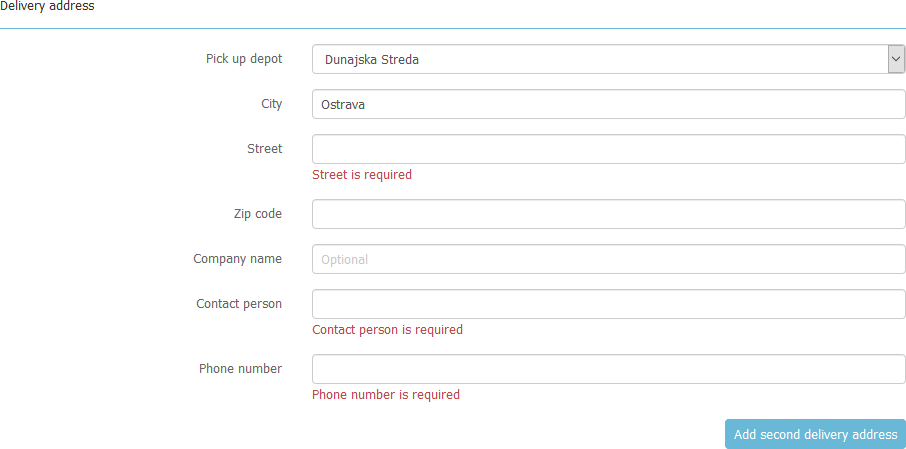
Delivery address: City, Contact person and Phone number are mandatory fields.
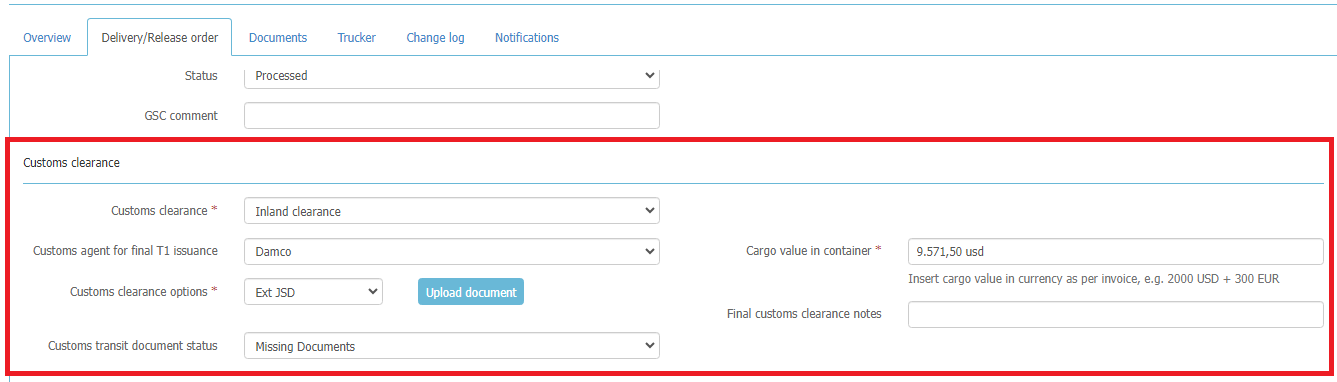
Customs Clearance is mandatory field. Please choose Port Clearance or Inland Clearance.
For Port Clearance insert ATC number for German ports if known or "ATC will follow".
For Koper provide customs clearance agent.

For Inland Clearance choose Customs clearance option.
T1 - T1 to be issued for final truck delivery.
JSD - container to be customs cleared on final inland depot by customs agency default at that depot (e.g. Portservice).
Ext JSD - container will be customs cleared by your customs agency and released for truck delivery after ext JSD/JCD provided to Maersk.
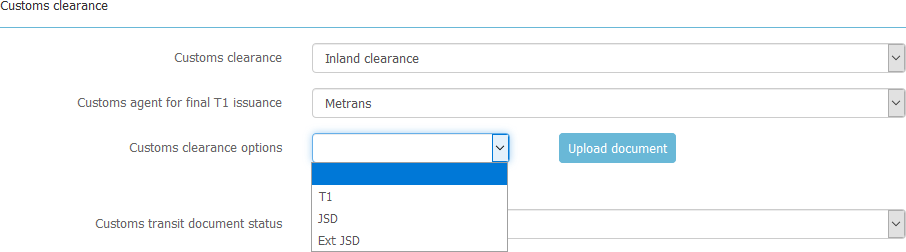
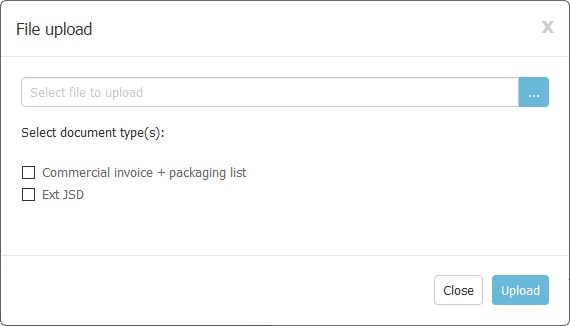
Click Upload document and tick relevant Document type. Select file from your computer and click Upload.
Update invoicing fields and press Submit.

If you use "Set instructions on template" the order status automatically becomes "New".
Go to the tab New or All and find needed bills of lading or container numbers as per SEARCH option.
Tick needed bills of lading and press FUNCTION>Set instruction on template.
Choose needed Template from the dropdown list and press Set.
Note: inland delivery templates should be applied to SD bookings and CY bookings (in case inland delivery is needed).
Add Customer cargo description and HS code, Upload documents for customs clearance process and press Submit.

Delivery date and time can be added later, close to train arrival date.
Go to the tab New or All and find needed bills of lading or container numbers as per SEARCH option.
Tick needed bills of lading and press FUNCTION>Remove delivery date.

System will show you warning, if you want to clear date and time of deliveries, press Remove.

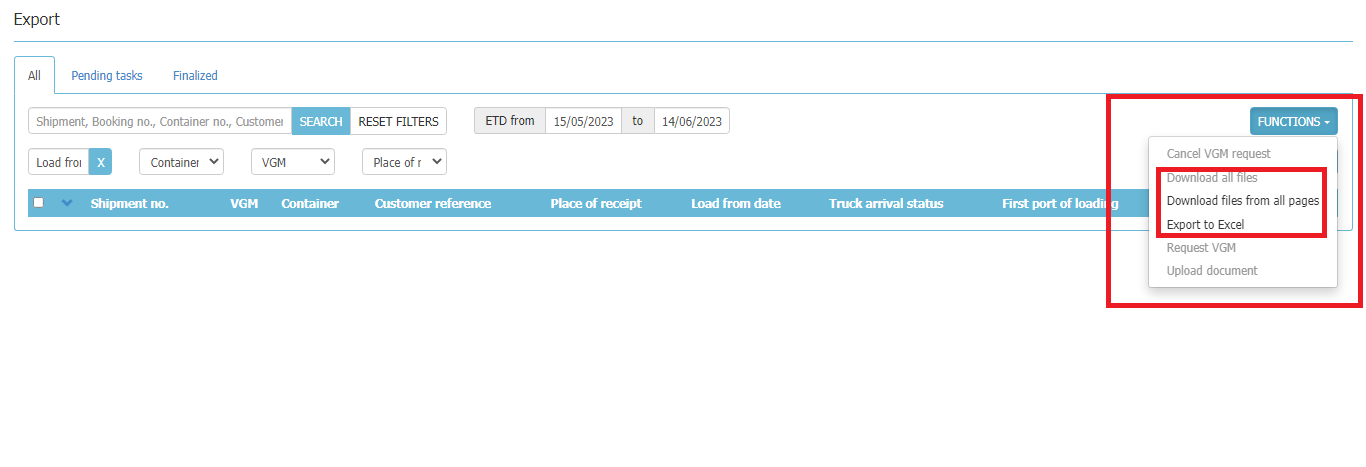
Download all files - tick the shipment on the list (or put shipment /container/BL needed to the SEARCH field) and then go to FUNCTIONS, click ”Download all files”. Selected files downloaded in Zip format
Download files from all pages - It downloads files from all pages
Export to Excel - tick the shipment on the list (or put shipment /container/BL needed to the SEARCH field) and then go to FUNCTIONS, click “Export to excel“. Selected shipments Exported from Port agent table to csv - excel file

The import instructions date is the date when data was added/changed in the delivery/release order.
The import instructions date is added/changed in the following cases:
- initial issuance of instructions;
- changing the delivery date (changing only the delivery time, but not the date, does not change the import instructions date);
- changing instructions (any field in delivery/release order) if delivery is rejected;
- changing a terminal outside of the terminal group;
- rejecting delivery.
The following algorithms depend on the import instructions date:
- automatic update of yellow trucks to green (the algorithm selects the earliest delivery by the import instructions date);
- sorting deliveries in the TRUCKS interface (deliveries are sorted by the import instructions date - older ones at the top, newer ones at the bottom);
- filling in instructions using a template (prohibited if instructions have already been issued, i.e. the import instructions date is filled in);
- multiple setting of the delivery date (prohibited if instructions have not yet been issued, i.e. the import instructions date is empty).
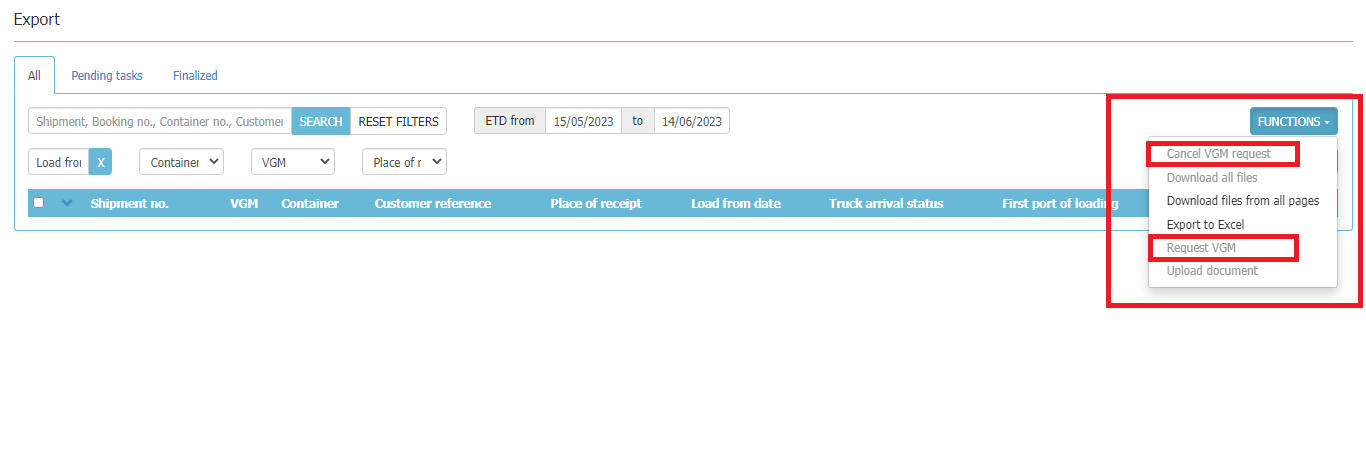
Once you receive your Booking confirmation, you will be able to find your SD booking in E-maersk and can order VGM weighing by simple selecting the shipment and go to FUNCTIONS > Request VGM. Deadline for placing or
cancellation of VGM request in E-maersk is 10:00 day A for day B stuffing.
As soon as the weighing slip is uploaded by terminal to E-maersk, you will receive the weighing slip via email.
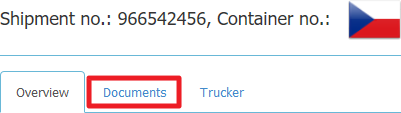
You can also download the document from E-maersk, just click on the shipment in EXPORT view and see Documents tab.
Instead of sending export customs documents via email, you have the option to upload them directly to your export shipment in E-maersk.
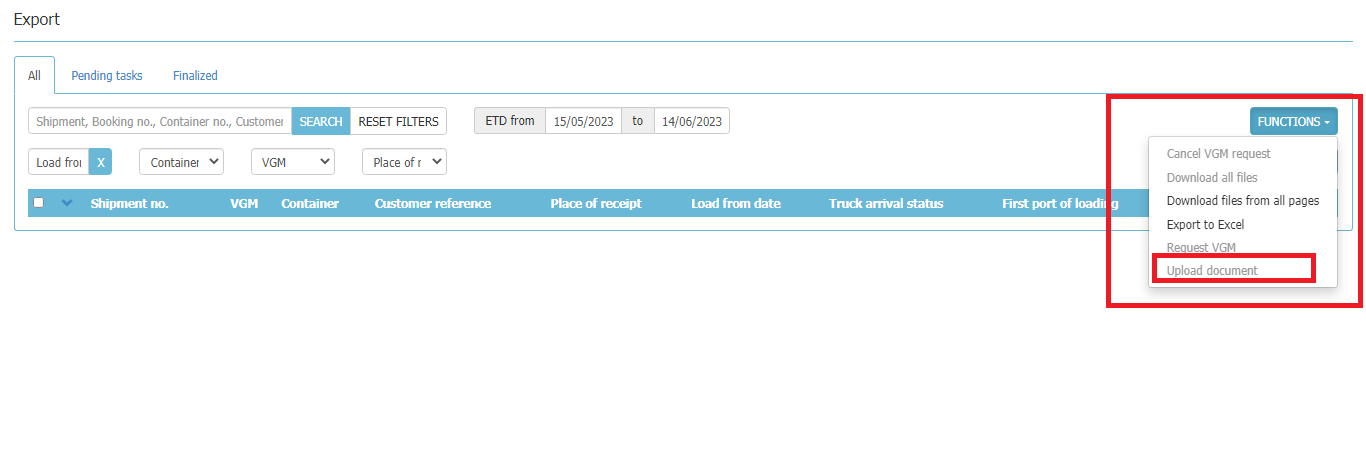
Tick either individual container from shipment, if you have export documents per container or select all containers from the shipment, if you have consolidated documents for all containers in one file and go to
FUNCTIONS>Upload document.
Mark the type of document you are uploading:
- DGD document if your shipment is dangerous cargo, DGD needed for BHT creation.
- EX1/VDD/MRN for standard export customs documents.
And click on Upload button. Max. size of file is 10MB.
Kindly upload the documents to E-maersk latest 1 day after stuffing, so documents are available for train departure.
T1 documents should not be uploaded to E-maersk and need to be sent to cz.export/sk.export emails same as today due to the need to print and physically give the documents to the train.
You can find the driver’s details after 15.00 for next day loadings in EXPORT view – tab TRUCKER or in TRUCKS view by clicking on the arrow on left.


You will also receive the driver’s details via automated email after 15.00, or later as soon as details are known and updated in E-maersk.
Download all files - tick the shipment on the list (or put shipment /container/BL needed to the SEARCH field) and then go to FUNCTIONS, click ”Download all files”. Selected files downloaded in Zip format
Download files from all pages - It downloads files from all pages
Export to Excel - tick the shipment on the list (or put shipment /container/BL needed to the SEARCH field) and then go to FUNCTIONS, click “Export to excel“. Selected shipments Exported from Port agent table to csv - excel file
You can check trucks availability for specific date and terminals.
You can select the day on the scale or use the calendar on the right and click GO.

GREEN – trucks are available at particular terminals and dates. The same lights are visible in calendar, when you place delivery orders.

YELLOW – trucks are available after confirmation from dispatcher only, afternoon loadings/deliveries have higher probability to be approved.
RED – trucks are not available.
How you will know which depot capacity is valid for your export/import shipment? Check the route provided in your quote, later visible on Booking confirmation as product as well. In case any concern, you are welcome to
contact customer service team.
Filtration by:
Import instructions date - for import shipments (min date is on the top, max date is below)
Creation date in database - for export shipments (min date is on the top, max date is below)
In case there are some deliveries updated in yellow, and a green truck is deleted, first yellow delivery gets automatically confirmed and changed to green.
This rule works for deliveries within the same terminal group.